Our Story

Welcome to our site! We are Joanne & Steve. After 20+ years working for a city school department and police department, we sold almost everything, bought an RV, and started living on the road with our three children. Joanne homeschooled and worked online. Over the years we worked for Jellystone Parks as well as volunteered. We stopped traveling after 7 years and bought a house. Steve continued police work with the National Park Service and Joanne taught Kindergarten. Now that our three kids are adults, we have decided to travel more and explore.
.


Wednesday, March 27, 2013

Campground Review: Jamaica Beach RV Park, Galveston, Texas


Jamaica Beach RV Park
Galveston Island, 
Galveston , Texas

After checking in and spending a day sight-seeing, we booked a second month.  (February & March 2013). We had site # 103, which is located at the front of the park, overlooking the Gulf of Mexico. The sites are concrete with grass areas.  Not huge, but adequate.


The owners, Ron and Dora, do everything humanly possible to make your stay pleasant and enjoyable. During Mardi Gras, they set-up an RV and BBQ grill along the seawall parade route (11 miles from the campground) and fed everyone from the resort for free (tips appreciated). 

On Wednesday of each week, Dora takes people shopping.  The ladies usually get together and go to lunch and then shopping for the day; so, if you do not have a tow-vehicle, you can still get into town for groceries, or go out and get beads, yarn, clothes, or wine (again, no charge ~ tips appreciated). 

Weekend Movies
Also, twice a week they serve breakfast (Wed & Sat mornings) for a nominal fee. Pot-luck, during the off-season, is on Thursdays and is enjoyed by many. They have a communal fire pit where they sometimes host a hotdog and smores event (no charge). Plenty of other activities are scheduled (jewelry making classes; RV related seminars; swap meet; etc...) 

The beach across the street is within walking distance; also, you can drive your vehicle on the beach in designated areas. The fishing was great (our group caught plenty of whiting; pompano; catfish and an occasional drum).


The campground boasts two pools and a hot-tub. One pool is heated at the beginning of Spring Break; the other has a swim-up bar for the adults (this feature was not open during our stay). 


Resident Muscovy Duck
The laundry was efficient. The bathrooms were clean. Cost of propane was a little steep in my opinion ($26 for a 30 pound tank); but, it is the "only game in town" for propane. Overall, this is a wonderful resort. You are not "nickeled and dimed"; you can wash your RV for free. Electric was included in our monthly rate of $545 (taxes included). The owners just completed a major overhaul of the park, doubling its size, and there is still some debris in the back of the campground. WITHOUT HESITATION, WE WOULD RETURN! 

The island of Galveston is well worth the visit with lots of restaurants, shops, and miles of clean, hard-packed-sandy beaches.


 There is a Kroger's (get gas points) and Walmart in town.  But for quick needs, there is a small market a stone's throw away, next to a good restaurant, Nate's.

Pleasure Pier

Lots of shops, bars, and cafés.

dead fish


Horseback Riding 
Visit our Things to do in Texas page ...

Tuesday, March 19, 2013

Texas or Bust...Now we Have Rust!

It has been grand living about 2 football fields from the Gulf of Mexico.  Not so much for our metal family members, namely bicycles, the hitch, and the underside of the truck.  What was once shiny and chrome, or clean iron, is now a coppery-rust.  Salt air is not their friend.

The purpose of this post is not to show you that metal rusts.  We all know that.  It's to remind you that being so close to seawater will speed up the process.  And before you know it, all your iron is oxidizing.


R­ust is the common name for a very common compound, iron oxide.
For iron to become iron oxide, three things are required: iron, water and oxygen. Here's what happens when the three get together:


When a drop of water hits an iron object, two things begin to happen almost immediately. First, the water, a good electrolyte, combines with carbon dioxide in the air to form a weak carbonic acid, an even better electrolyte. As the acid is formed and the iron dissolved, some of the water will begin to break down into its component pieces -- hydrogen and oxygen. The free oxygen and dissolved iron bond into iron oxide, in the process freeing electrons. The electrons liberated from the anode portion of the iron flow to the cathode, which may be a piece of a metal less electrically reactive than iron, or another point on the piece of iron itself.
The chemical compounds found in liquids like acid rain, seawater and the salt-loaded spray from snow-belt roads make them better electrolytes than pure water, allowing their presence to speed the process of rusting on iron and other forms of corrosion on other metals.  


Of course, chrome doesn't actually rust.  Chrome is applied to metal and in doing so prohibits any oxygen from interacting with the metal, thus preventing oxidation from occurring.  Oxidation is part of the rusting process.  

The metal to which chrome is bonded rusts.  Apparently, any tiny scratch in the chrome will allow oxygen and perhaps, water, in to make contact with the metal below.

You will see rust at these fissures.  But below the chrome, the rust is consuming the metal.


Even our laundry drying rack wasn't safe.  


Monday, March 11, 2013

Cocoa


Today, we read the story All About Chocolate online through ReadingA-Z.com.  (Thanks KV)
ReadingA-Z is a subscription site with hundreds of leveled readers to print, or read right online in a projected format.  They do offer free downloads from time to time though.  It may be worth the subscription price if you get a few people to share the price, then share the password.  


After reading about bitter, unsweetened chocolate, I thought I'd have the kiddos try some Baker's Unsweetened bar and Hershey's Unsweetened Cocoa.


We'll use it for baking another day.

Finished it all off with a Magic School Bus from DiscoveryEducation.com. (Thanks JC)
The students fly to the rainforest to see why Ms. Frizzle's cocoa (ka-kow) tree 
isn't producing cocoa pods.


Thursday, March 7, 2013

Installing a Rear View Camera System

When pulling a 40-foot fifth-wheel, there is a huge blind spot to the rear.  Unless you are lucky enough to purchase a rig with an preinstalled rear-view camera, you'll want to install your own.  
We purchased a wired unit, which requires more work to install, but, in our opinion works better.

We selected a dual-camera set up (RVS-813613) with a quick disconnect kit (RVS-2133) 
(A quick disconnect kit is like an extension cord that attached the wiring installed in the truck to the wiring installed on the fifth wheel.)

This was a two-part process.  


Part: I:  Wiring the Fifth Wheel

Step 1: Locate a mounting location.  We chose just below the clearance markers (so the clearance marker lights didn't interfere with the night vision.)

Step 2: Attach camera bracket.  For the bracket, I drilled four holes and used Eternabond tape and silicon around the threads of the bolts to prevent moisture from entering.  

One camera focuses on the rear cargo rack holding my scooter;
the other is aimed on traffic.
The camera also has night vision and a microphone to pick up
ambient noise.

Step 3: Because this is a dual camera set up, each camera has its own dedicated cable.  This kit includes 66 feet of cable per camera, which was more than enough for our needs.  

The instruction manual suggested drilling quarter- to half- inch holes per cable to route them through the RV.  The thought of drilling two half-inch holes scared me, so, I opted to run PVC piping from the camera to the hitch. I only ran PVC on the end caps; I followed the frame underneath and zip-tied the cables to the frame.

Camera cables travel through PVC to hitch in front.
                               
PVC runs across top of rig and down left side to frame.
                                   
Rear PVC housing from camera to frame.

Transition from PVC to frame.
       
             I attached the PVC pipe using standard PVC brackets.  This required one small pilot hole per bracket. And again, I added Eternabond and silicon to each screw location.

 
Pilot hole for PVC bracket
Eternabond over the pilot hole
       
Front transition from frame to king pin.
I used adapters to accomodate the curve of
the fifth wheel.

 
   Terminus of the cable and PVC into the kingpin.

Since I began at the rear, and moved my way forward,
I could coil up the excess cable and place it in 
                                                              the cavity of the kingpin.

Cables into the kingpin
Step 4:  Install Quick Connect terminal.  I drilled a hole into the kingpin bracket to insert the Quick Connect terminal.
Quick Connect Terminal

Part II: Wiring the Tow Vehicle

Step 1: To get into the cab of the truck, I chose to follow the path of the cable for the emergency brake.  This had a water-tight seal.  I needed to enlarge the hole that the emergency cable went through in order to get the two camera cables in.  I then used plumbers putty to fill in the oem plug to make it water -tight again.

Emergency cable plug removed before
addition of camera cables.

Emergency brake cable with newly added
camera cables and plumber's putty.

Step 2: I zip-tied the control unit to the wiring harness located beneath the steering wheel/ignition column.  This is tucked up underneath out of the way.

The three-channel multiplex control unit, pictured on the right, was attached to the wiring harness beneath the steering wheel/ignition column.

Step 3: I installed the Quick Disconnect in the rear pocket stake on the passenger side in the bed of the truck.  I utilized pre-existing tie down holes for this terminal.  
Note: I chose the passenger side of the truck so it would not interfere with the 7-pin harness connector.


Step 4: Connect the monitor to the multi-plex control unit.


Now you can travel with confidence, and back-in with ease.

Sunday, March 3, 2013

Children's Museum of Houston...DON'T Miss It!

If you are anywhere near the Children's Museum of Houston, and have children, you have to take a day to visit.  We spent 4 1/2 hours there Saturday, and could have spent 4 1/2 more.  

The museum is clean, bright, well-planned, and full of wonderful, age-appropriate, educational and fun activities.  In the warmer weather there is a outdoor water park.  

Here kids learn about animals, matter, motion, gravity, ecology, recycling, and the human body, 
for starters.


outdoor puppet theater
tracks and balls
Kids' Hall
 When you enter the museum you walk through Kids' Hall, a spectacular, visually inviting area that, on the day we visited, had many activities to celebrate Dr. Seuss's birthday.  Here you also find the Parent Resource Library and Fresh Cafe.


How many different phones can you see?


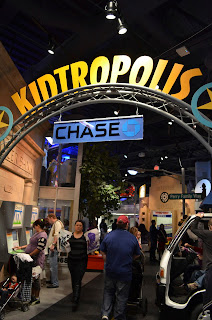
Our favorite part of the museum is Kidtropolis, USA.  Kidtropolis is a Main Street where you find a bank, TV station, police and rescue, city hall, atm machines, restaurant, grocery market, vet, art studio and post office. Here, children run the town.  Pick a job, dress up, get paid, go to the ATM, or the bank.  Enjoy a meal or shop for food.  Bring your pet to the doc, or send a package in the mail.  Everything is made for the kids.  (If only schools had this city.)


Chef Brendan was in his glory.
Do you want to anchor, or produce?  Or maybe, be the camera person?


Down another level is Invention Convention and Cyberchase.  In invention convention, kids, and parents, use cups, straws, pipe cleaners, tape, scissors, paper, legos, and various other items to construct flying, rolling, spinning, and balancing objects, and then, test them out in various wind tunnels, ramps, and moving gadgets.


Cyberchase has all the familiar characters of the favorite math-themed show from PBS.  Just outside that room is the 35 foot tall, 3-story high, Power Tower, and the rock wall, all part of the section called PowerPlay!


Save this area for last.  They'll be wiped.

And here's the great part...
The fee for admission is $9.00 per person.  
OR
Free visits for all on Thursdays from 5pm - 8pm.
OR
FREE entrance for Bank of America card holders on the first weekend of each month.

Worth. Every. Penny.